Not long ago, I was asked to create a glass vase with a resin design for a 50th wedding anniversary gift. I was given specific instructions to use the traditional anniversary year color as one of the colors within the design. Still, ultimately, I could have free reign over the remainder of the work. A list of things needed to create resin vases includes the following:
Glass vase
Electric tumbler turner
Spray paint of your choice in color
Micas
Clear high gloss epoxy resin 1:1
Resin mixing cups for resin and enough for each mica color used
Freezer paper to cover your work area.
Nitrile or latex-free gloves
Paper towels
Popsicle sticks to mix resin and micas
Heat gun or kitchen cooking torch
Metal tin to place under the electric turner (optional)
Silicone resin spatula (optional)
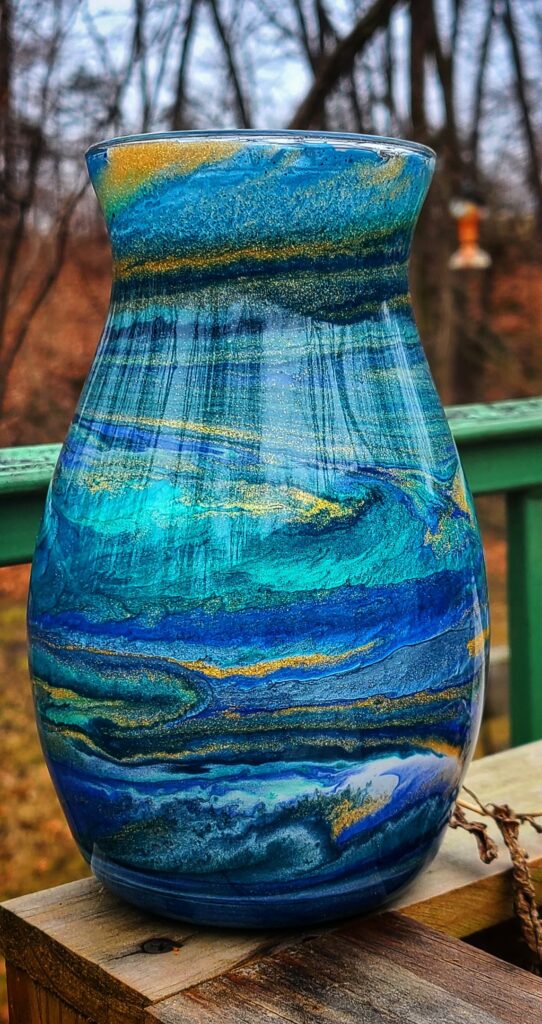
I ended up choosing more nautical color choices as sea colors can also enhance gold tones quite nicely. I picked a set of micas from my collection that had emerald, navy, gold, white, turquoise, light marine, pearl light blue, and a pearl black for a slight contrast to pair with the gold nugget sparkle mica I was going to be using.
When using resin, it is customary to prepare a safe area because the fumes from the raw ingredients can be harmful to some. I have not had any bad reactions, but I have seen and heard the stories from others. So, I use precautions just to be safe. I first lay out freezer paper along the surface of the table I use so that I do not leave any residue on my counters or my table and have a huge mess to worry about later. I also wear nitrile gloves when handling resin and mixing these two parts.
To begin, I set my glass vase on the paper next to the tumbler turner that I have placed on a tin tray (I’ll go over why I use a tin tray in a little bit). I used navy spray paint to lightly dust the vase for good coverage first because the resin can be transparent with some micas, plus the light dusting of paint can also help adhere the resin to the glass surface better.
Once the paint has dried for approximately five to ten minutes, depending on how heavy a layer is applied, I place the vase over the foam mount on the electric tumbler. I then measure out the micas into separate, clear, two-ounce cups. Keep in mind that you’ll need very little colorant to get the effect you’re looking for.
You will measure the amounts of parts A and B of the resin needed for the desired size vase you’re working with. When working with 1:1 ratio resin, it needs to be said to measure by volume, not weight. IT WILL NOT work otherwise. I ended up using around four ounces, perhaps a little more for this project. You will need to mix part A by itself for two minutes and repeat this same step with part B in its cup. Once both parts have been mixed separately, you’ll then pour part A into part B and be sure to scrape all of part A from its cup into part B for equal amounts to remain at a 1:1 ratio. Once both parts are in the same cup, you mix them for two to five minutes. The formula will get hazy in color and then go clear again. You will also find that air bubbles begin to form within the mixture, which is okay.
Next, you’ll want to decide how much of each color you want on your vase. You will first want to keep most of the transparent resin to coat the vase before adding colors. Once it is coated, you can add the rest of the colors as needed.
I used almost equal parts, except with black; I used a minimal amount of hinting in areas to break up some of the color patches here and there to aid in contrast and dimension. You will add some of the transparent resin into the cups of mica and blend them until they look smooth and no power is present. The texture will look like warm honey.
Next, turn the tumbler on and begin by adding some clear resin to the vase. I use my hands for this step, but some prefer to use a silicon resin spatula. I use my hands to feel (using gloves, of course) where all the resin has coated and sealed the vase. I do not want to miss places like the rim of the vase, for example. You will lightly allow the tumbler turner to do most of the work for you in this step by just holding your gloved hands along the glass surface until the resin has coated the vase evenly. Be sure to coat the bottom of your vase as well. I then wipe any resin off my gloves with paper towels.
Next, you’ll pick resin colors to drizzle in whatever pattern you choose over the vase as it turns on the tumbler. This is where the tin tray comes in handy; I can use the popsicle sticks to dip back into the resin and add drops to the vase if I need to. Pour the resin from the very top-facing side of the vase; gravity plays a crucial role in your design. The resin will move along the vase in marbled patterns as the tumbler spins. You can see the video from my Facebook page link found here: https://fb.watch/aOKyf-8oG1/
Go slowly when you add your colors, and keep in mind that as the vase turns, the resin colors will meet and blend, so be patient. Add resin to areas that need it by checking from eye level for dips in the resin surfaces. If you have clear resin left, a few drops here and there can add a neat effect to the colors and depth of the design.
Once you’re happy with all the resin applied, lightly fan a heat gun on the lowest setting or a kitchen cooking torch across the surface of the vase to pop any air bubbles that may get trapped in the resin. Do not get the heat too close to the resin; a few inches away is more than enough distance, and do not linger in one spot too long because you can end up melting your design very quickly and ruining your look.
Allow the vase to spin for around twenty minutes and check back. If you notice a lump on the bottom of the vase from the resin, take a popsicle stick or the silicone spatula while it’s turning and lightly swipe it to the rim. You’ll want to smooth it out for a flat surface. It is okay that the colors blend there; nobody focuses on the bottoms.
Traditionally, I allow my vases to spin in a closed-off room away from kids and pets for about twelve hours. I checked the vase every twenty minutes for its first two hours to ensure no lump was forming on the bottom.
Once it is dry, your project is complete, and no other steps are needed to enjoy your beautiful vase!